How to Design Valentine’s Day Nails at Home
How to Design Valentine’s Day Nails at Home (Soft, Classic + Elevated)
A calm, step-by-step manicure you can do in one evening—designed to look polished, not “crafty.” Think blush, micro-hearts, and clean shine.
The key to Valentine’s nails that look expensive
The most “high-end” Valentine manicure isn’t the one with the most detail—it’s the one with the cleanest shape, the most even base color, and the most intentional accent. This guide is built like a salon appointment: prep, shape, base, design, seal, and aftercare.
Quick table of contents
Tools & product checklist (simple, not fussy)
You don’t need a drawer full of tools. You need a few basics—and to use them in the right order.
Prep essentials
Nail file (180–240 grit), buffer, cuticle remover (or warm soak), cuticle pusher, lint-free pads (or tissue), and remover/cleanser.
Goal: smooth base
Polish essentials
Base coat, 1–2 “main” colors (blush, milky pink, soft red), a detail color (berry or white), and a glossy top coat.
Goal: even coverage
Design helpers (optional but helpful)
Dotting tool (or bobby pin tip), striping brush (or toothpick), and thin tape for clean lines.
Goal: clean accents
Aftercare that changes everything
Cuticle oil + a rich hand cream. Use after top coat dries, then nightly for 3–5 days.
Goal: “expensive” hands
Choose your nail shape (the most flattering Valentine options)
If you only improve one thing, improve shape. Clean shape instantly makes a manicure look professional—even before color.
| Shape | Best for | Why it looks elevated | Valentine design match |
|---|---|---|---|
| Soft square | Short nails, practical hands | Clean edges without looking harsh | Micro-hearts, French tips, minimal accents |
| Squoval | Most nail beds (universal) | Salon-like finish with low maintenance | Blush base + one accent nail |
| Short almond | Medium length | Instantly elongates fingers | Heart “halo,” negative space, soft ombré |
| Oval | Fragile nails (less snagging) | Soft, feminine, always classic | Milky pink + berry detail |
Editor’s note: Match all nails first. Then soften corners. If you shape “one by one,” the set will look uneven.
Step-by-step Valentine manicure (the salon order)
This order prevents bumps, smudges, and the #1 issue: polish that lifts at the cuticle line.
Remove old polish + cleanse the nail plate
Use remover, then quickly wash and dry hands. Finish with a swipe of cleanser/remover on each nail to remove oils.
Shape first (before soaking)
File in one direction (less splitting). Keep a consistent silhouette across all nails—then refine.
Cuticle prep (gentle, minimal)
Soften cuticles, push back lightly, and remove only loose cuticle residue. Over-cutting makes the manicure look rough after 48 hours.
Light buff (only where needed)
Buffing is for smoothing ridges—not thinning the nail. Two to three passes max in one spot.
Base coat + cap the free edge
Swipe base coat across the tip edge. That small detail is what helps prevent early chipping.
Two thin coats of color (thin beats perfect)
Thin layers dry faster and look smoother. Leave a hairline gap from the cuticle—then float the brush closer without touching skin.
Design accents (keep it intentional)
Pick one “statement”: a micro-heart, a French edge, or a soft ombré—then repeat minimally across the set.
Top coat + seal the tips again
Top coat should slightly wrap the edge. Let dry fully before cuticle oil (oil too soon can dull shine).
3 Valentine nail designs that look polished (not busy)
Choose one style, then keep the set consistent. The “luxury” look is restraint + symmetry.
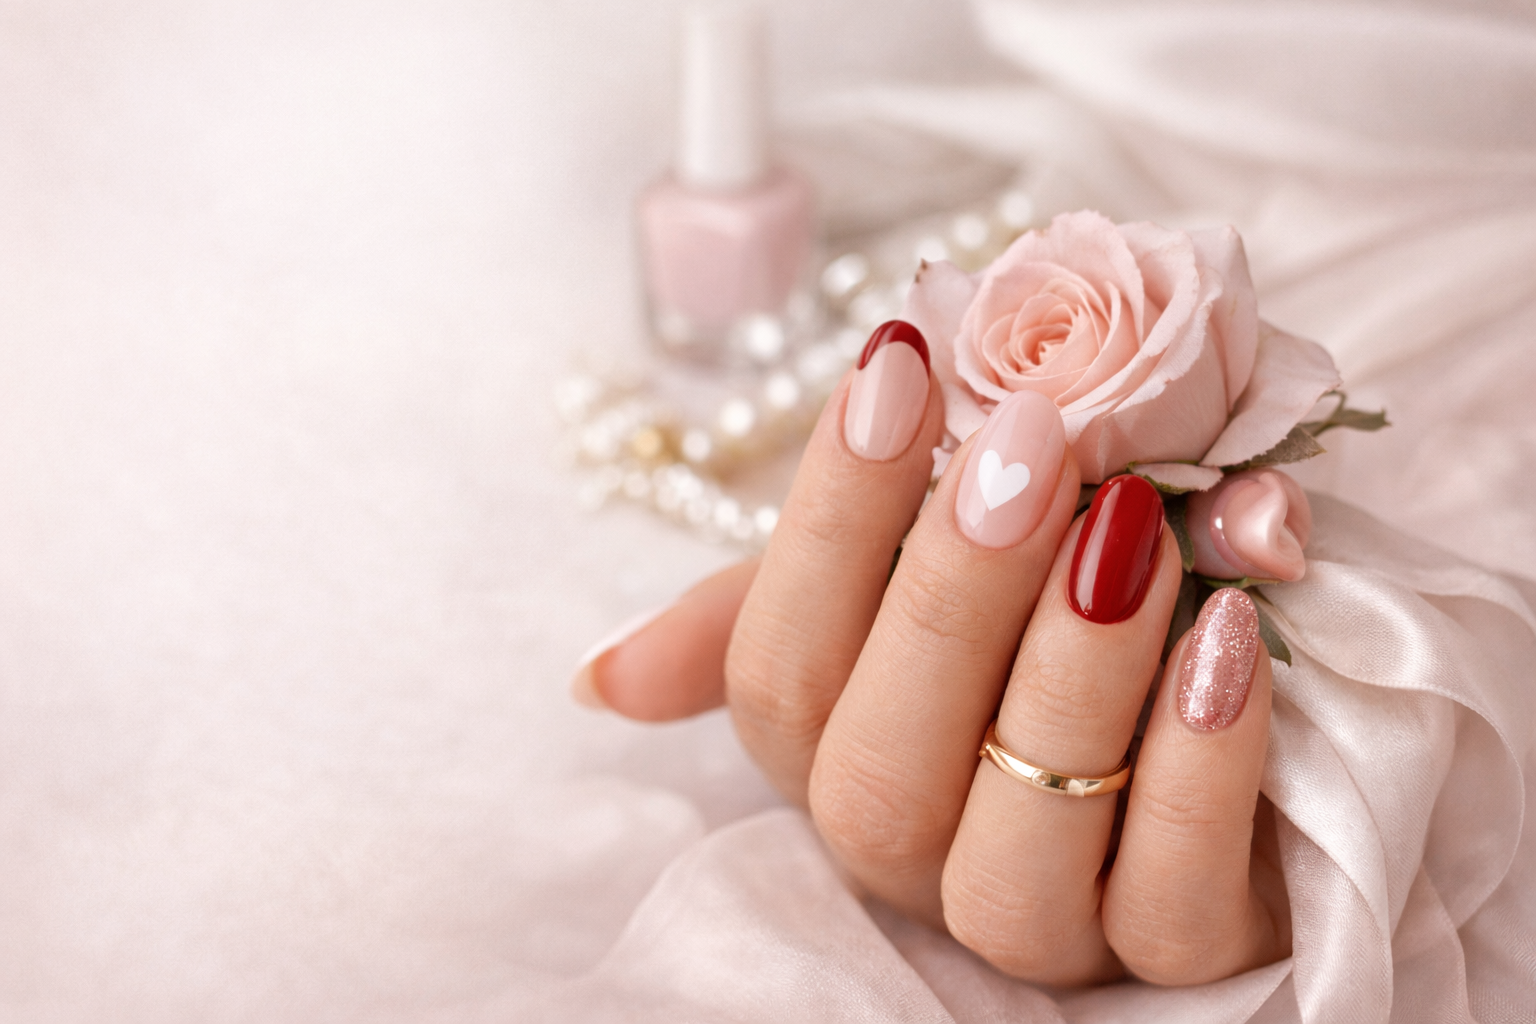
Design #1: The Classic Blush French (soft + timeless)
Base: milky blush
Tip: soft white or pale pink
Upgrade: one ring-finger micro-heart on the base (not the tip).
Best for: short nails
Design #2: Micro-Hearts on a Clean Nude (minimal + modern)
Base: sheer nude or milky pink
Hearts: 1–2 per hand, tiny (use a dotting tool)
Placement: near the cuticle corner or sidewall—never centered on every nail.
Best for: everyday wear
Design #3: Berry Accent Nail (quiet drama)
Base: blush or soft pink on 8 nails
Accent: deep berry on 2 nails (ring fingers)
Optional: a single tiny heart in blush on top of berry (one nail only).
Best for: “evening” polish
Design balance rule (the reason sets look cohesive)
Keep your accents to 2 nails max per hand. If you add hearts, reduce color changes.
If you add color changes, reduce hearts. One statement, one supporting detail—then finish with shine.
Result: expensive-looking
Common mistakes (and quick fixes)
| If this happens… | It usually means… | Fix it like a pro |
|---|---|---|
| Polish lifts near cuticles | Oil on nail plate, or polish touched skin | Cleanse nails before base coat; leave a tiny gap at cuticle line; use a small brush dipped in remover to sharpen edges. |
| Streaky pink | Coats are too thick or drying unevenly | Do 2–3 very thin coats; wait a full minute between layers; switch to a milky “buildable” shade. |
| Hearts look messy | Too large, placed on every nail | Make hearts smaller; move them to corners; add them to 1–2 nails only; top coat will smooth edges. |
| Top coat looks dull | Oil applied too early or top coat too thin | Let top coat dry longer; apply a slightly thicker top coat layer; oil hands after fully set. |
Editor’s note: If you smudge one nail, don’t redo the whole set. Remove and redo just that nail, then top coat everything again for uniform shine.
FAQ: Valentine’s manicure at home
How do I make my manicure last longer than 2–3 days?
Longevity is mostly prep: cleanse the nail plate, use base coat, keep layers thin, and seal the tips with both base and top coat. Then use cuticle oil nightly (after nails are fully dry).
What’s the easiest Valentine design that still looks “special”?
A milky pink base with a single micro-heart on each ring finger. It reads romantic, but still polished and wearable—especially for short nails.
Should I do matte or glossy for Valentine’s?
Glossy is the more timeless “luxury” finish and flatters most shades. Matte can look editorial, but it shows texture more easily—so it’s best when your base layers are very smooth.
How can I make hands look more “finished” with the manicure?
Pair nails with an evening routine that supports glow and softness—especially in winter. Your manicure looks more elevated when your hands are hydrated and your cuticles are cared for.
Recommended read: Professional-Grade Nightly Skincare Products
Related reading (Beauty & Care)
If you want the full “reset” feeling—skin + nails—this pairs beautifully with tonight’s manicure.
Mini checklist to screenshot
Before you paint
Shape all nails → cleanse nail plate → base coat → cap tips.
Prep = longevity
After you paint
Top coat → cap tips → let fully set → cuticle oil nightly.
Shine = “luxury”